

How to use Atlas: quick start guide
Last updated October 6, 2026
Overview
This guide shows you around Atlas in a few minutes: how to sign in, what you see first, what each menu is for, and the first things to do depending on your role.
Access & Permissions
How you utilize Atlas depends on your role within your organization:
As a Support Agent: Your primary focus is daily operations. You will use Atlas to manage and resolve incoming customer tickets, ensuring high-quality support.
As an Administrator: Your focus is system optimization. Grounded in your organization's business needs, you can configure the entire Atlas environment: including rules, chatbots, channel integrations, and features, to build a workflow tailored precisely to your requirements.
Step 1: Sign in
Go to atlas.so , click "Sign in" and enter your email and password. The first time, accept the invitation email your Admin sent and set your password.
After you sign in, Atlas opens the "Inbox".
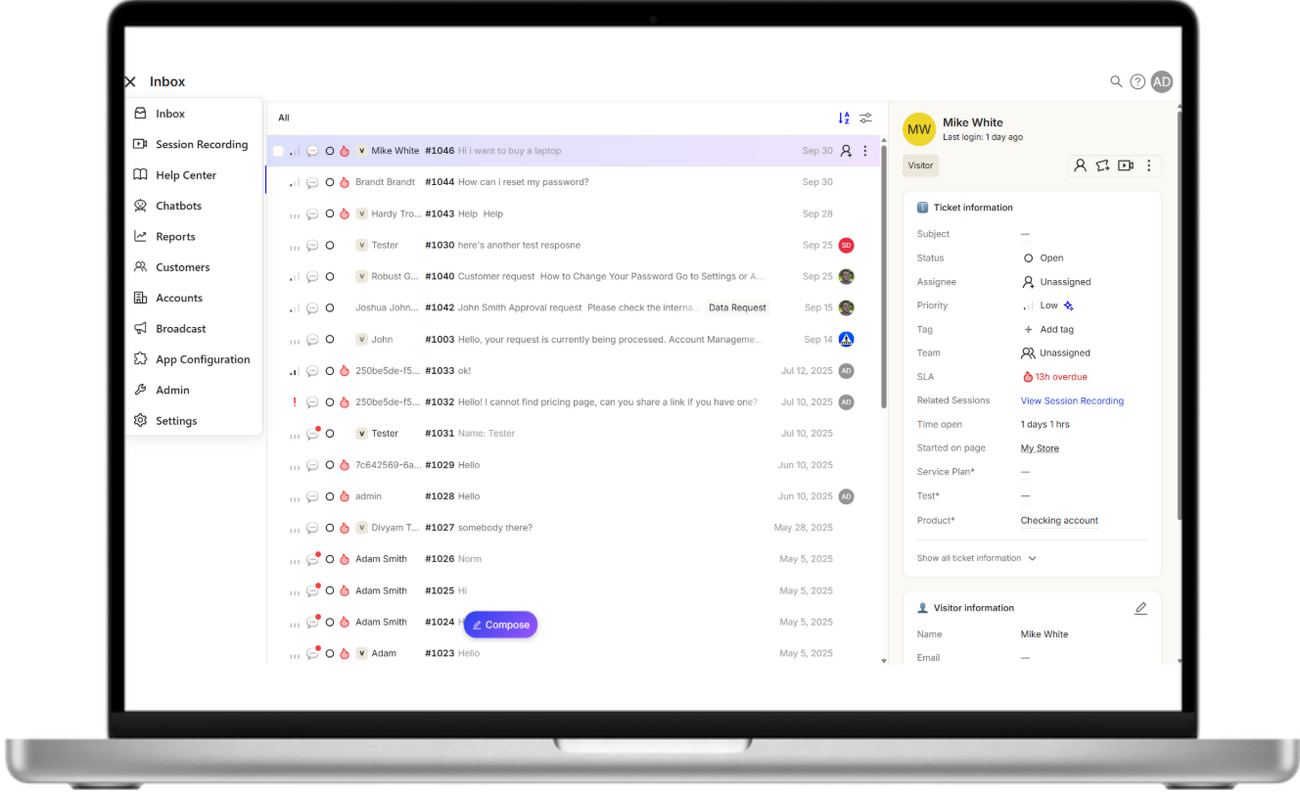
Step 2: Get to know the Inbox
The Inbox is where you work on tickets from every channel.
- Views: "My tickets", "Unassigned", "All", "Pending" and "Archived". "Snoozed" appears only when you have snoozed tickets. Click "Add inbox" to create a custom view.
- Ticket list: Open a ticket to see the conversation, reply, or add an internal note.
- Side pane: See the customer, their account, status, priority, assignee, team, tags and SLA.
- Reply box: Insert canned responses with "#" and help center articles with "$", attach files, add variables, and use Zeus AI suggestions.
Step 3: Find your way around
Click the main menu (the three lines in the top left corner) to open these options:
| Menu | What it's for |
| Inbox | Manage, create and answer tickets. |
| Session Recording | Replay customer sessions with developer tools. |
| Help Center | Create, organize and publish articles. |
| Zeus AI | Train, test and deploy Atlas's AI agent. |
| Chatbots | Build chatbots and workflows from connected blocks and publish. |
| Reports | Track ticket, CSAT, SLA, tag, agent, session, chatbot and Help Center metrics, and schedule reports. |
| Customers | View and add customer profiles and build segments. |
| Accounts | View and add company accounts and their customers and tickets. |
| Broadcast | Send campaigns to customer segments. |
| App Configuration | Admin-only settings: installation, channels, ticket management, shifts, chatbots, Help Center, data and integrations. |
| Settings | Your profile, notifications and schedule. Admins also manage the organization, team and security. |
Search, quick actions, and see your profile
Top right of the screen:

- Search icon 🔍︎: Search across Atlas.
- Question icon ?: "Chat with us", " View help center ", " View developer docs ", "Schedule a call" and "Show hotkeys".
- Your profile: Open your profile and preferences , or log out.
Step 4: Your first tasks
If you're an agent
- Set your name, photo, time zone and theme in " Settings > Profile ".
- Choose how you get notified in " Settings > Notifications ".
- Check your shifts in " Settings > Schedule ". If your Admin turned on "Show team shifts", you also see your teammates' shifts.
- Explore the options: Start a sidebar conversation ("Shift+S") to loop in someone outside the ticket, and snooze or merge tickets from the "Ticket Actions"(ellipsis icon ⋮).
- Open " My tickets " and answer your first ticket. Explore the ticket interface and the options. Try a canned response with "#".
If you're an Admin
- Complete the "Onboarding checklist" on the right side of the Inbox. Click "Configure" on each task, then "Mark as done":
- "Setup chat configuration": Style the chat widget and write the first messages customers see.
- "Connect your CRM": See contacts and leads next to every ticket.
- "Setup email ticketing": Turn emails sent to your support address into tickets.
- "Connect to Slack": Reply to customers directly from Slack.
- "Invite your team": Add teammates to collaborate on support requests.
- "Connect your project management tool": Create tasks from support requests.
- Create and review your teammates' roles in " Settings > Team ".
- Set business hours in " Settings > Organization " and turn on 2FA in " Settings > Security ".
- Set up canned responses, tags, teams, routing rules and SLAs in "App Configuration > Ticket Management ".
- Connect any other tools your team uses in " App Configuration > Integrations ".
- If you need a custom connection, create API keys and webhooks in " App Configuration > Data > API & webhooks ".
- Configure your Help Center and customer portal in " App Configuration > Help Center " before you start publishing articles.
- Publish your first Help Center articles.