

Installing Atlas Chat
Last updated February 4, 2025
Overview
This guide explains how to install Atlas Chat and Session Recording in your application, regardless of the framework or platform you're using.
Installation steps
There are two main steps in the installation process:
- Adding the Atlas SDK to your application
- Identifying users (for logged-in experiences)
Step 1: Adding the Atlas SDK
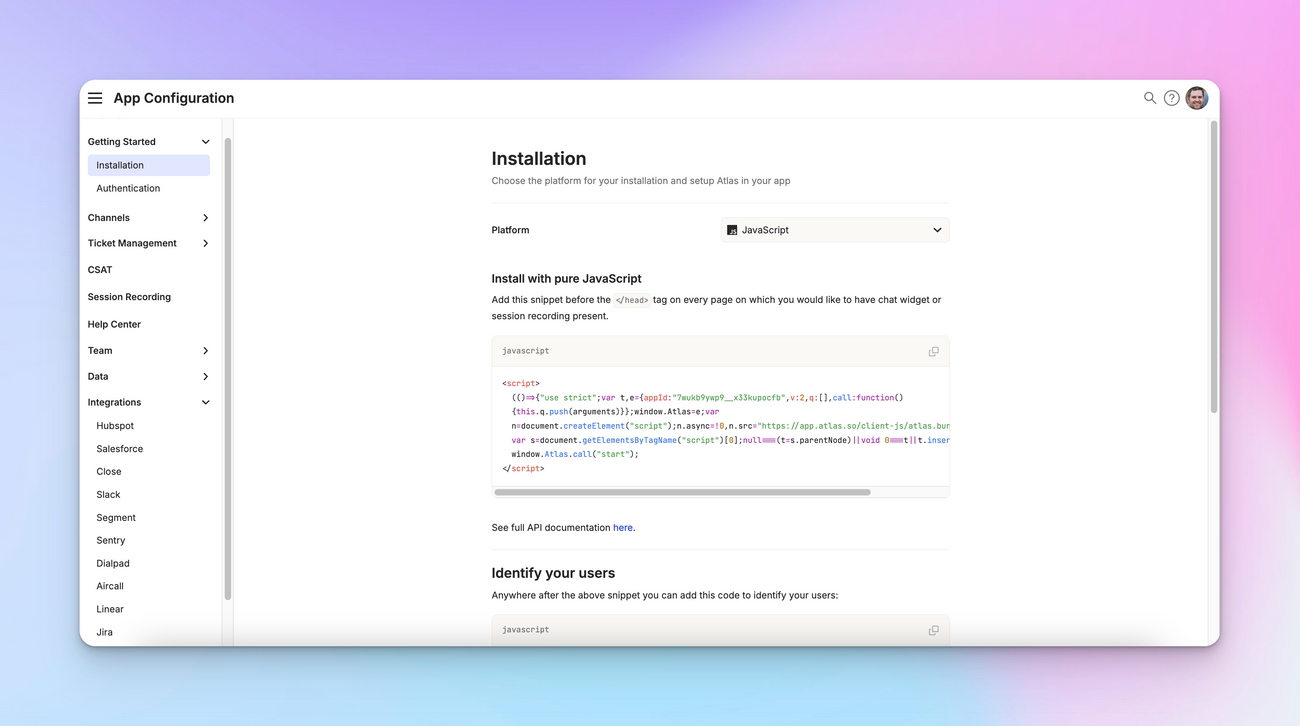
To begin the installation, Go to the hamburger menu and select “ App Configuration > Installation ”. Choose your platform (JavaScript, React, Next.js, mobile, or other web platforms).
<script>
(()=>{"use strict";const t={appId:"YOUR-APP-ID",q:[],identify:function(t){this.q.push(["identify",t])}};window.Atlas=t;const e=document.createElement("script");e.async=!0;e.src="https://app.getatlas.io/client-js/atlas.bundle.js";const s=document.getElementsByTagName("script")[0];s.parentNode?.insertBefore(e,s)})();
</script>
For web applications, you'll need to add a piece of JavaScript code to your application. This code snippet is just a few lines long and should be placed in the head of your HTML.
Important: Place this code in a location that's present on every page of your application, such as the root directory or base.html. This ensures the code executes every time a user refreshes or changes pages.
Once you've added the snippet, you should see the Atlas widget appear in your application.
Specific instructions for different frameworks (e.g., Google Tag Manager, React, Next.js, plain JavaScript) are available on the installation page.
Step 2: Identifying users
The second step is crucial for applications where users can log in. Use the "identify" call method exposed by our JavaScript or mobile SDKs. Pass user information to Atlas through this method.
window.Atlas.call("identify", {
	userId: "User Id",
	name: "User Name",
	email: "User Email",
	fields: {
	    "title": "",
	    "department": "",
	    "photo": "",
	    "accountName": "",
	    "phone": "",
	    "street1": "",
	    "street2": "",
	    "city": "",
	    "country": "",
	    "postalCode": "",
	    "secondaryEmail": "",
	},
	"customFields": {
    	"tier": "free",
	    "type": "chat",
    	"isGuest": true,
	    "mrr": 1000
  	},
})
The identify call allows you to send various user details to Atlas, including:
- User ID
- Username
- Company-related information
- Custom fields
While a basic format is provided, you can refer to the full API documentation for details on passing additional fields, such as custom fields or company-level information.
After implementing the identify call, when a user starts a chat, their actual information will appear in the Atlas inbox. For example, you'll see "Chat started by John" instead of a generic user.
Installation for marketing sites
If you're installing Atlas on a marketing site where users aren't typically logged in, Atlas will create a widget or dummy user for visitors who initiate a chat.
Supported platforms
Atlas supports a wide range of platforms:
- Web applications
- Mobile applications
- Various frameworks and tools
Our SDKs (JavaScript SDK for web, Mobile SDK for mobile apps) make integration possible across these diverse platforms.
By following these steps, you should be able to successfully install Atlas Chat and Session Recording in your application. This will enable you to identify users, enhance security, and provide a more personalized support experience.